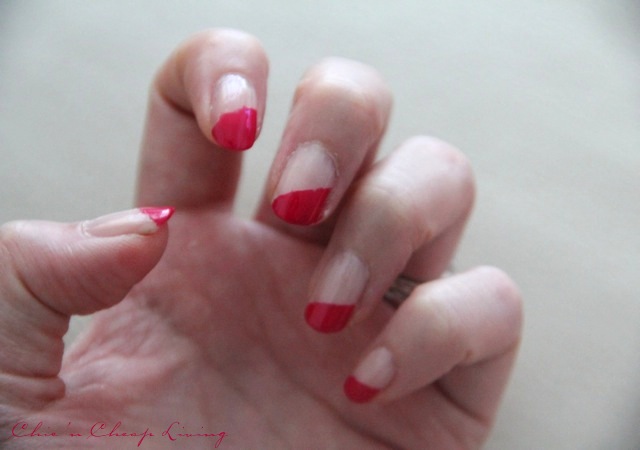
We may not all have invitations to fashion week, but we can definitely take inspiration from fashion week to create our own fashion week looks! I was definitely inspired by looks on the runways and magazines when I did my chevron Reverse French Manicure and polka Dot Manicure. When I saw these simple and bright nails (colors can be interchanged so simply for darker shades!) at Lauren Moffat for NYFW Spring 2013, I jumped at the chance to recreate this  fun look.
The manicure at Lauren Moffat, NYFW Spring 2013
Here are the materials you need to create your manicure:
- base coat
- top coat
- 2 shades of contrasting nail polish (I recommend one neutral shade and one bright shade)
- pieces of scotch tape to cover each nail
- a good/entertaining TV show while nails dry (optional)
Here are the steps I used to create this manicure:
1. I trimmed and shaped my nails and painted it the base coat. Then I layered on my base color.
2. I ripped out 10 pieces of tape that were about 1″ each.
3. I used the midpoint of one side of my nail as a start point and the diagonal corner on the other side as an end point. I used one side of one piece of tape to connect the start point and end point to cover the bottom half of my nail. I left this on for 5 minutes.
4. I painted the top, exposed part of my nail with the darker color. I peeled off the tape after 10 minutes.
5. Finally, I used a top coat to seal in the two colors.
Remember to shape, buff, and seal per my instructions for a perfect at home manicure so your look will last for a few days!


fun! i like the diagonal look, keeps the nails more interesting. and this diy is totally attainable! yay.
i love these diagonal nails!! and it’s actually a DIY i feel like i can attempt..i always see crazy ridic nail DIY’s and i’m like ‘ uhhh yeah… that’s not gonna happen ‘ hahahahahha :p
Me too! Some manicures are beautiful, but way too complicated!
LOVING this mani look – so fun for fall!! 🙂
I need to try some fun mani looks – the most complicated I get is covering solid polish with glitter during the holidays. Your nails look great 🙂
those look really cool, and seem simple enough that even i could pull it off!
Aw lovely! Your DIY came out so well, love the inspiration and your results match the real runway look beautifully!
I’m terrible at this, I’m way too impatient!
They look fabulous!!! Great job. Makes me want to play a bit 🙂 xoxo
Your diagonal painted nails are really cute! Such a fun look 🙂
http://www.averysweetblog.com/
I’ve done something similar with tape and nails, and it’s really not easy working with tape. But you did a fab job with these diagonal colorblock nails. Love both shades.
this is SO cool – i will absolutely have to try it. thank you for the tutorial!!
xox P
phiphisblog.com
suuuuper cute!! p.s. thanks for the congrats on wesley, i will write you back soon!
These are totally rad. If I had an ounce of patience to let them dry – I’d be in! Do they come in stickers?
Oh that is a cute idea, very sweet and fun!
Now following your blog!
Daisy Dayz
Enter my giveaway to win designer shades
Great job! I actually just attempted this look free hand because I find tape or stickers peel away polish :/